
Image processing procedure: "LRGB" treatment
This page describes the procedure for the "LRGB" treatment of image processing
(The procedure does not describe the technical points implemented in Photoshop to achieve the steps of the treatment: a future tutorial will be made to detail them)
Prerequisites
Before starting the "LRGB" treatment, we need a luminance image of our object to be processed. In the opposite case, it is necessary to create a so-called "synthetic" luminance from the RGB image.
For the "LRGB" treatment, it is the luminance image that contains all the details of our object (including the noise) while the RGB color image will bring the chrominance information and can be deliberately blurred (Gaussian blur) to reduce its noise.

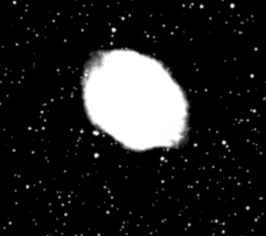
Synthetic luminance used for the "LRGB" treatment
The best way to get a synthetic luminance from an RGB image is to go through Photoshop's "Lab" mode and select only the "Brightness" layer. The resulting image contains less signal than a real luminance (lower signal-to-noise ratio) but it allows a "LRGB" treatment which will always be better than a simple RGB treatment.
This luminosity layer is then added on the RGB color layer resulting from the "Stretching" process and the "Brightness" mode is chosen for the new layer just created.
Color treatment
The first treatment must be performed on the "Color" layer in order to better show the different tones of the RGB layers. We must of course disable the "luminance" layer in order to see the final effect (note that the luminance mode of the "luminance" layer has the effect of "wash out" colors that must be accentuated)
For our example, we apply 3 adjustment layers in "clipping mask" mode to apply the changes only to the color layer. In addition, we add a fusion mask on the object with a moderate Gaussian blur so as to apply the settings only on our object and not on the sky background as this would increase the chromatic noise.
1 / Adjustment of "Hue / Saturation" layer with fusion mask on the object: we increase the saturation of the colors so as to reinforce them
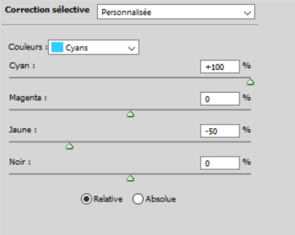
2 / Adjustment of "Selective correction" layer with fusion mask on the object: this correction allow to adjust the colors between them by playing on each layer: reinforcement of red and blue in our example
3 / Adjustment of "Colors balance" layer with fusion mask on the object: it plays on highlights and midtones for the final rendering of the color balance
4 / Create a cumulative layer of the previous settings (MAJ-CRTL-ALT-G) and then apply a slight Gaussian blur to reduce the chromatic noise. In my example, since I only apply color changes to the object, the chrominance noise is mostly visible on the object (disable the "Luminance" layer to observe it).
Difference before and after the color treatment

Before color treatment

After color treatment
Luminance treatment
The second treatment is performed on the "Luminance" layer in order to reduce the noise which is much more present.
For our example, we apply 2 layers adjustment with 2 separate noise reductions on the sky background and on the object itself.

1/ "Curve" adjustment layer: increase the contrast of the average tones slightly
2 / "Levels" adjustment layer: make the sky background a little darker by getting closer to the histogram but without increasing the noise.
3 / Create a mask on the stars only by selecting them with the "Select stars" tool of "Focal Pointe Observatory" (See links page): 4-pixel expansion with progressive contour of 2 pixels.
4 / Then create 2 fusion masks with moderate Gaussian blur: one only on the sky background and another on the object itself but without the stars (use of the mask of stars)
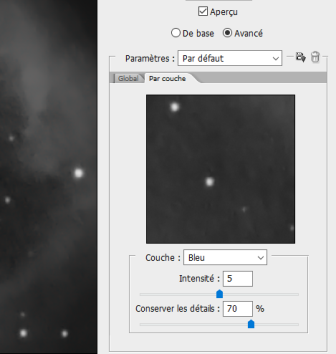
5 / Create a cumulative layer of the previous settings and then apply a fusion mask on the object itself (without the stars): use of the tool "Reduction of the noise" by layer with moderated settings in order not to remove too many details.
6 / Create a cumulative layer of the previous settings and then apply a fusion mask on the sky background: use the "Noise Reduction" tool to reduce a little the noise of background from the sky.
Difference before and after the luminance treatment

Before processing the luminance

After processing the luminance
Final processing
The final "LRGB" treatment consist by increasing the brightness, reducing the areas too saturated and increasing the contrast without increasing the noise.


1 / Make an adjustment of "Brightness / Contrast" layer with a fusion mask on the object (without the stars): we increase both the brightness and the contrast by checking that the the brightest areas do not saturate and the noise remains under control.
2 / Make a "Hue / Saturation" setting layer with fusion mask only on the saturated areas of the object: this is to reduce the areas that have become a little too saturated at the previous process stage.
Difference before and after increased brightness and contrast

Before the brightness and contrast increase

After the brightness and contrast increase
Results
Difference between the output of the "stretching" treatment and the output of the "LRGB" treatment

Output of "Stretching" treatment
Output of LRGB treatment
As an example, here is the stack of layers that were used for the "LRGB" processing step

